

Last Updated: October 26, 2026
Quick Summary
Custom gunite pool construction follows a sequential process: design and permitting, site preparation and excavation, steel and utility rough-in with inspection approval, gunite application and curing, interior finish installation, and startup. Most projects take 8 to 12 weeks from permit approval to completion.
- Utility marking through 811 is mandatory before excavation and typically takes 3 to 5 business days.
- Steel, plumbing, and electrical rough-in must pass building department inspection before gunite can be sprayed.
- Gunite application takes 1 to 2 days, followed by 7 days of initial curing with regular water misting.
- Permitting typically takes 2 to 4 weeks and is the most variable front-end phase of the project.
- Water chemistry balancing during startup takes 1 to 2 weeks as new plaster cures and leaches minerals.
Table of Contents
- Design, Planning, and Permitting for Custom Gunite Pool Construction
- Utility Marking, Site Preparation, and Excavation
- Gunite Pool Construction Phases: Steel, Plumbing, and Electrical
- Gunite Application, Curing, and Interior Finishes
- How Long Does It Take to Build a Gunite Pool
- Gunite Pool Startup and Water Chemistry
- Starting Your Custom Pool Project with All About Pools & Spas
- Frequently Asked Questions
Design, Planning, and Permitting for Custom Gunite Pool Construction
Building a custom gunite pool requires careful planning before a shovel touches the ground. The design phase determines the pool’s shape, placement, water circulation, and whether your project clears local inspections.
Your design should reflect both aesthetics and function, accounting for sun exposure, drainage, trees, and how the pool relates to your home and yard.
Permits are non-negotiable. Most jurisdictions require building, electrical, and plumbing permits before construction begins.
Work with a licensed contractor who knows your local code requirements. When you’re ready to move forward, gunite inground pools from All About Pools & Spas showcase how professional design translates into finished pools that meet code and exceed expectations.
Utility Marking, Site Preparation, and Excavation
Before excavation, identify all underground utilities: gas lines, water mains, electrical conduits, and sewer lines.
Once utilities are marked, the contractor removes vegetation, levels the ground, and establishes the pool’s outline using string and stakes.
Excavation follows. Crews dig a hole matching your pool’s exact shape and depth, and excavated soil must be removed or redistributed on your property.
The excavated hole must be properly graded so water drains away from the pool structure.
Gunite Pool Construction Phases: Steel, Plumbing, and Electrical
After excavation, construction moves into the structural phase, where the quality of the finished shell is decided. Three trades work in sequence inside the hole, steel, plumbing, and electrical, and each has an inspection hold point before gunite can be sprayed. Understanding what happens here, and what you can verify yourself, is the best protection against problems buried under concrete.
Steel reinforcement: the skeleton of the shell
Rebar is laid out in a grid across the pool floor and bent up the walls, then tied with wire at every intersection so the cage cannot shift during spraying.
What you can check: bar size and spacing match the engineered plan, the cage is tied (not just laid), there are no gaps at corners or transitions, and the steel is elevated off the soil.
Plumbing rough-in and pressure testing
Rough plumbing includes the main drain at the deepest point, skimmer lines at the waterline, return lines that distribute filtered water back into the pool, and any dedicated lines for water features, a spa, or a cleaning system.
Every line is pressure-tested before gunite is applied.
What you can check: ask to see the pressure gauge reading, confirm the test was held for the full period, and confirm the lines are still under pressure when the gunite crew arrives.
Electrical rough-in and bonding
A licensed electrician runs conduit from the equipment pad and the house to the pool area, installing wiring for the pump, filter, heater, lights, and any automation. First, the pool must be bonded: a continuous copper bonding conductor connects the rebar cage, metal light niches, pump, heater, and any metal handrails or ladders into a single equipotential grid. Second, pool equipment circuits require ground-fault circuit interrupter protection, and the equipment pad needs a clearly labeled disconnect within sight of the pump.
What you can check: confirm the bonding wire is clamped to the rebar cage before gunite, once the shell is sprayed, a missed bond is very difficult to correct, and confirm the electrician is licensed and pulling the electrical permit in their name.
The rough-in inspection hold point
Before gunite, the local building department inspects the steel, bonding, plumbing, and electrical rough-in together. This is the single most important inspection in the build: everything it covers is about to be permanently encased. Corrections after gunite are expensive; most before it are a few hours of labor. Don’t let schedule pressure push the crew into spraying before sign-off, a reputable contractor treats that inspection as a hard stop, not a formality.
If your contractor proposes spraying gunite before the rough-in inspection is complete, treat it as a red flag. The inspection exists to catch exactly the errors that become irreversible once the shell is in place.
At the end of this phase, you should have: engineered steel at the specified size and spacing, elevated off the soil; plumbing pressure-tested and holding; bonding wire clamped to the cage; a licensed electrical rough-in; and a signed rough-in inspection. Verify all five before the gunite crew mobilizes.
::: Securing these foundational elements requires the same level of diligence as choosing renovation contractors to ensure the long-term structural integrity of your backyard investment.
Gunite Application, Curing, and Interior Finishes
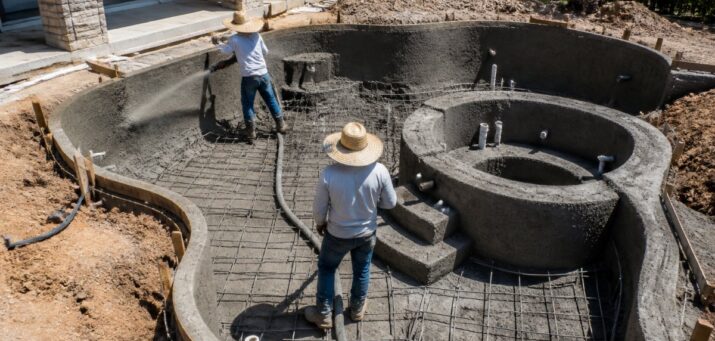
Gunite application is where your pool shell takes shape. Gunite is a mixture of cement, sand, and water sprayed at high pressure onto the steel framework.
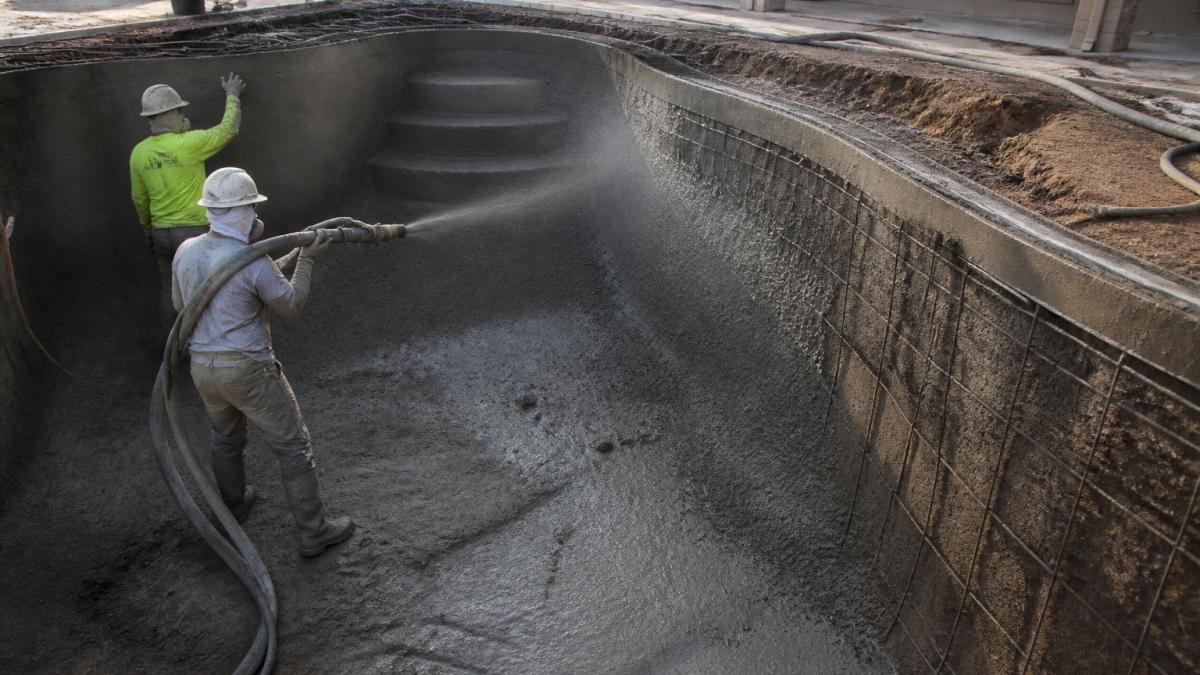
Gunite application typically takes 1 to 2 days for a residential pool. Once sprayed, the gunite must cure: initial curing happens over 7 days as the concrete hardens, and the shell is kept moist, sprayed with water regularly, to ensure proper hydration and strength. Temperature and humidity affect curing time; cooler or drier conditions may extend it.
After initial curing, the interior finish is applied. Most custom gunite pools use plaster, troweled over the cured shell to create a waterproof barrier.
Coping, the edge trim around the top of the pool, is installed after the shell is complete, stone, concrete, or decorative material that complements your design.
How Long Does It Take to Build a Gunite Pool
Most custom gunite pools take roughly 8 to 12 weeks from permit approval to startup, but what matters is which tasks can overlap, which cannot, and where the schedule actually stalls. A phase list tells you the order; a dependency map tells you why your project is running late and what you can do about it.
The dependency chain
The build is a chain of hard sequential links with a few soft overlaps. Design and permitting must finish before excavation, which must finish before steel. Steel, plumbing, and electrical rough-in run in sequence, and all three must be complete before the rough-in inspection. Gunite cannot be sprayed until that inspection is signed off, and it must cure before finish materials go on.
Typical durations and where they slip
- Design and permitting: 2 to 4 weeks. This is the most variable front-end item. Plan review queues, setback or impervious-cover questions, and any required engineering can each add time. Submitting a complete plan the first time is the single biggest schedule lever you control.
- Layout and excavation: 1 to 3 days of digging, plus utility locating (call 811 several business days ahead) and soil haul-off. Rock, high groundwater, or tight access for equipment can turn a two-day dig into a week.
- Steel, plumbing, and electrical rough-in: roughly 1 to 2 weeks combined, depending on pool complexity and how quickly the electrical permit and inspection slot come together.
Weather and season
Rain can halt excavation and delay gunite; freezing temperatures stop gunite application outright, and extreme heat or wind speeds moisture loss during curing and demands more attentive wetting. In most of the country, the practical construction window is spring through early fall, and late-fall starts often carry into the next season. Ask your contractor how they handle curing in your climate, covered shells, timed misting, or curing compounds, because curing method affects both schedule and long-term shell durability.
How schedule connects to cost
Every delay has a price, and most show up as change orders rather than line items. Rock during excavation, high groundwater requiring dewatering, poor access forcing smaller equipment or hand digging, and upgraded finishes selected after signing all add time and money. The cheapest schedule is planned around known site conditions: a soil assessment and realistic access plan before signing do more for your budget than any negotiation after digging starts.
Ask for a schedule that names the inspection hold points and the weather-sensitive tasks. A contractor who can show you where the project can and cannot compress is telling you they have built this before.
Plan on 8 to 12 weeks, but budget your patience around three things: permit review, the rough-in inspection, and weather during gunite and curing. Those are the stalls you cannot buy your way out of, and planning for them is cheaper than reacting to them.
Gunite Pool Startup and Water Chemistry
Once construction is complete, the pool must be filled and the water balanced before use.
Water chemistry is critical from day one. New plaster is alkaline and leaches minerals into the water, raising pH and alkalinity.
A professional pool startup service handles this correctly: testing water daily, adjusting chemicals as needed, and monitoring plaster curing.
After startup, ongoing maintenance keeps your pool healthy. Many homeowners find that professional maintenance programs save time and extend pool life by catching issues early.
Starting Your Custom Pool Project with All About Pools & Spas
Building a custom gunite pool is a significant investment that transforms your backyard into a personal oasis. Understanding the average cost to build an inground pool helps you plan your budget before moving forward.
The key to a successful project is choosing a contractor who understands custom gunite pool construction and your local building codes. How to Choose a Pool Contractor: A 2026 Guide walks you through evaluating contractors, asking the right questions, and protecting yourself before signing a contract.
All About Pools & Spas brings family-owned expertise to every custom build. We handle design, permitting, construction, and startup so you don’t have to.
Building a custom gunite pool is an exciting project that creates lasting memories for your family.
| Phase | Duration | Key Activities |
|---|---|---|
| Design & Permitting | 2-4 weeks | Site assessment, plan development, permit applications |
| Site Preparation | 1-2 weeks | Utility marking, excavation, grading |
| Rough-In | 1-2 weeks | Steel framework, plumbing, electrical installation |
| Inspections | 1 week | Building department verification of rough-in work |
| Gunite & Curing | 2-3 weeks | Shell application, moisture curing, initial hardening |
| Finishes & Decking | 2-3 weeks | Plaster application, coping, deck installation |
| Startup | 1-2 weeks | Filling, water chemistry balancing, equipment testing |
Site conditions significantly affect both timeline and cost. The National Association of Home Builders construction guidelines emphasize that soil assessment during excavation can reveal conditions requiring additional drainage or foundation work.
Local building codes vary by jurisdiction, but the International Building Code provisions for residential pools establish baseline safety and construction standards that most communities adopt.
Frequently Asked Questions
What are the main steps involved in custom gunite pool construction?
Custom gunite pool construction follows a structured sequence: design and permitting, site preparation and utility marking, excavation, steel reinforcement installation, plumbing and electrical rough-in, gunite application, curing, interior finishing (plaster or tile), decking, and final startup. Each phase builds on the previous one, with inspections at critical checkpoints. The entire process typically takes 8-12 weeks from excavation to filling, though timelines vary based on site conditions, weather, and design complexity. Your contractor will coordinate all phases and keep you informed of progress.
How long does it take to build a gunite pool from start to finish?
The total timeline for a custom gunite pool is usually 8-12 weeks after excavation begins, though the full project, including design, permitting, and pre-construction planning, can span 3-6 months. Gunite curing alone requires 7-10 days before finishing work begins. Weather delays, soil conditions, permit processing times, and design changes can extend the schedule. All About Pools & Spas manages the timeline carefully and communicates every milestone so you know when to expect crews and when your pool will be ready for water.
What permits and inspections are required for gunite pool construction?
Most jurisdictions require building permits for custom pool construction, with inspections at key stages: after excavation, after steel and plumbing rough-in, after gunite application, and before final filling. Permit requirements vary by location and include setback distances from property lines, electrical code compliance, and drainage standards. Your contractor handles permit applications and coordinates inspections to ensure code compliance. All About Pools & Spas is licensed and familiar with local requirements, ensuring your project meets all regulations without delays or costly corrections.
What should I do to prepare my yard before gunite pool construction begins?
Before construction starts, mark all utility lines (water, gas, electric, sewer) with your utility company, this is a critical safety step. Clear the construction area of obstacles, debris, and landscaping. Discuss site access with your contractor so equipment can reach the pool area safely. Notify neighbors about construction dates and expected noise. Plan for temporary disruptions to your yard and driveway. Your contractor will provide a detailed pre-construction checklist. All About Pools & Spas will walk you through site preparation and answer questions about what to expect during the build.
When can I fill and use my new gunite pool after construction is complete?
After gunite cures for 7-10 days, interior finishing (plaster or tile) is applied, then the pool can be filled and balanced. Water chemistry setup typically takes 3-7 days of testing and adjustment before the pool is safe for swimming. Your contractor will guide you through startup procedures, including chemical balance and equipment operation. All About Pools & Spas provides startup support and maintenance programs to help you maintain proper water chemistry and equipment performance from day one, ensuring your pool is ready for enjoyment as soon as possible.
What is gunite, and why is it used for custom pool construction?
Gunite is a spray-applied concrete mixture that forms the structural shell of a custom pool. It’s applied at high pressure onto a steel reinforcement framework, creating a durable, monolithic structure that can be shaped to any custom design. Gunite allows for unlimited pool shapes, sizes, and features, unlike vinyl or fiberglass options. It’s long-lasting, structurally sound, and provides a solid foundation for plaster, tile, or other interior finishes. Custom gunite pools are popular because they offer design flexibility and durability, making them ideal for homeowners who want a pool tailored exactly to their vision and backyard layout.
What quality-control checkpoints should I expect during gunite pool construction?
Quality checkpoints include inspection of excavation depth and soil compaction, verification of steel reinforcement placement and spacing, inspection of plumbing and electrical lines before gunite application, visual inspection of gunite coverage and thickness, curing verification before finishing, and final inspection of interior finishes and equipment. Your contractor should explain these checkpoints upfront and invite you to observe critical phases. All About Pools & Spas follows industry standards and communicates progress at each stage, ensuring your pool meets quality standards and your expectations throughout the build.
